cse15l-lab-reports
UCSD: How to Log Into ieng6
This will be a tutorial for CSE 15L students to log into their own course-specific account on ieng6, a remote server.
Step 1: Installing Visual Studio Code and Git
Visual Studio Code
We are going to be installing Visual Studio Code (VS Code). If you already have the application from a previous class or other circumstance you can skip to Step 2. Go to the Visual Studio Code website here. Click the down arrow to choose your operating system and download the stable build of your operating system.
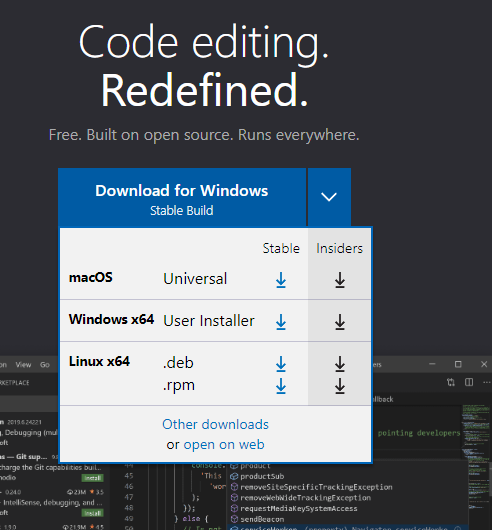
Go through with the installation and install it onto your computer.
Git
For windows users, you will have to install git to log into ieng6. For mac and linux, you should already have this installed in your computer and can proceed to Step 2. Go to this link and install git for windows. Follow the installation prompts and install it onto your computer.
Once git is installed, you have to configure git in VS Code. Open VS Code. At the top of the window, navigate to view then commnad palette. Type in “Select Default Profile” and select git bash. Now, at the top of the window navigate to terminal, then new terminal. This will open up a terminal window. In the terminal, click the + button and a new terminal will open up in Git Bash.

Step 2: Remotely Connecting
Great! Now you have VS Code and git on your computer. If you do not already have these installed, refer to Step 1. You will need to know your course specific account for CSE15L. To find this, proceed to this link. Enter your UCSD username and student ID and click submit. If you don’t know your username, you can also proceed with the Forget Username option.
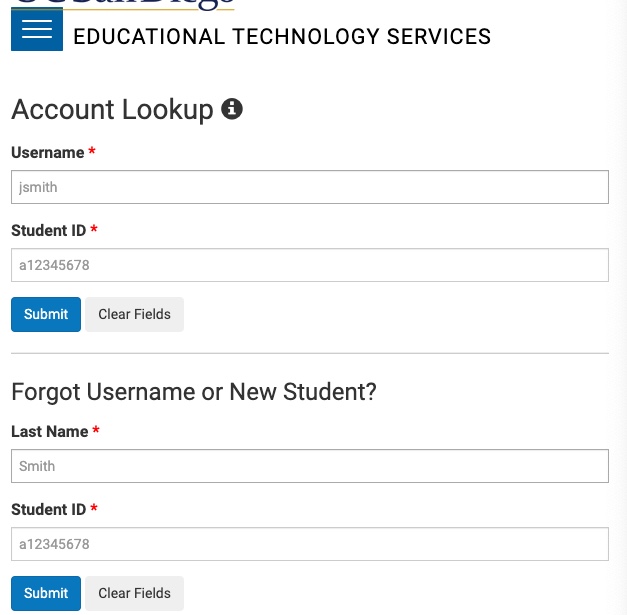
After looking up your account, you will need to change your password, as UCSD has a generic password already set. The reset may take a while so give it some time. Additionally, take note of the accounts under Additional Accounts. Look for one with the similar template of cs15lwi23xxx. Note that there is a lowercase L between 5 and W, it is not a number one.

Now, open up VS Code and go to the top of the window (For mac users, this will be at the very top of your screen) and click terminal then new terminal. It should look similar to the image below:

In the terminal type ssh cs 15wi23xxx@ieng6.ucsd.edu replacing the xxx with the letters associated with your account. You will then be prompted with a message asking if you want to continue. Type yes and hit enter. The terminal will then ask for a password. Enter your new password. Note it will look like you are not typing anything when you are. Then hit enter. If you have entered the correct password, your terminal should look similar to this:
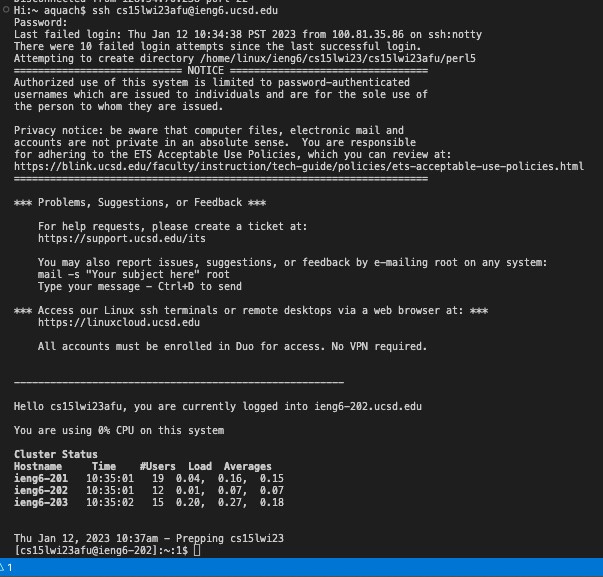
Now the terminal is connected to a computer in the CSE department.
Step 3: Commands
There are many commands that you can use in your terminal to access various directories and interact with them. Here, we are going to be covering a few. Try using pwd some text should appear. This command prints the working directory and shows where you are in the file system.

Now try using the command cd .. and then pwd the working directory has changed. Can you see guess what cd .. did? This command stands for change directory and the “..” means to go to the parent directory. Now use the command ls this will list all the directories under cs15lwi23. In other words, these are the directories of other students.

To exit out of the remote server either type the command exit or use the command ctrl + d to quit the terminal.
Congratulations! You have successfully conneceted to a remote server. There are many more commands to learn and things to do. However, if you have any trouble or need any help, feel free to ask a professor, teaching assistant, another student, or google search for help!